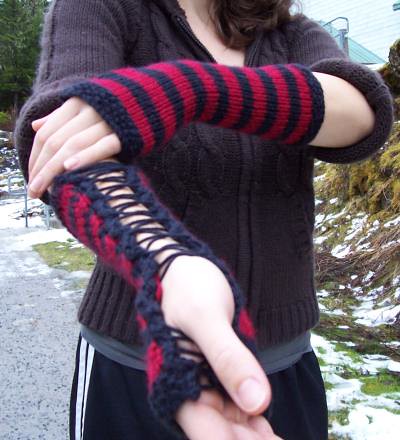
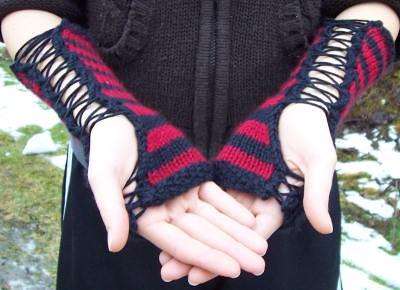
The perfect accessory for your punk rock lifestyle. I dreamed up these gloves at a concert where the lead singer was wearing regular striped arm-warmers in grey and black. I thought, How cool! But I can do better…
They are knit straight with shaping on both sides for the wrist, then finished with an applied i-cord for either side of the “corset” with extra spaces for the lacing holes. Rock on friends.
Level: Intermediate to Advanced
Size: Fits most adults
Length: 11 inches
Width (at ends): 6 inches
Width (at middle): 4 inches
Yarns:
MC = Caron Simply Soft [100% acrylic; worsted weight 4 ply; 315 yd per 170g skein]
CC = Red Heart Soft Yarn [100% acrylic; worsted weight; 4 ply; 256 yds per 140g per skein]; 1 skein each color
[MC] Black
[CC] Red
Needles:
1 set US #8/ 5 mm straight needles
1 set US #8/ 5 mm double-point needles
Tapestry needle
Gauge: 18 sts/24 rows = 4 inches St st
Pattern Notes:
The sizing for this pattern allows for 1-2 inches of space where the laces go over bare skin (that and it stretches nicely to form fit your arm). So when the measurement above says 6 inches, it will fit a hand that is 8 or 9 inches around the knuckles.
St st stripes will always be four rows to a color.
The applied i-cord is knit with spaces in order to lace up the gloves. There are no spaces in the cord where the thumbs go. The knitted portions of the border i-cord bands that don’t use picked up stitches form arches which will be your lacing holes.
Read this before you begin:
ssk = slip slip knit.
k2tog = knit two together.
sl = slip stitch. psso = pass slipped stitch over.
knit one from body = knit the next stitch on the needle holding picked up stitches.
sldpn = Slide stitches to opposite end of dpn, RS facing, don’t turn to face WS. (Makes i-cord)
MC = main color (black), CC = contrasting color (red)
Body Begin:
CO 26 st in MC.
Row 1 [RS]: *[k1, p1] repeat to end.
Row 2 [WS]: *[p1, k1] repeat to end. [Seed stitch]
Repeat rows 1 and 2 four more times [Six rows of seed stitch total]
Row 7[RS]: Change color to CC. k to end of row.
Row 8[WS]: p to end of row.
Continue to p every WS row.
Row 9: k
Row 11: Change color to MC. k to end of row.
Row 13: k
Body Decreases:
Row 1[RS]: Change color to CC. k1, ssk, k 20 st, k2tog, k1.
Row 2[WS]: p
Continue to p every WS row.
Row 3: k
Row 5: Change color to MC. k1, ssk, k 18 st, k2tog, k1.
Row 7: k
Row 9: Change color to CC. k1, ssk, k 16 st, k2tog, k1.
Row 11: k
Row 13: Change color to MC. k1, ssk, k 14 st, k2tog, k1.
Row 15: k
Body Middle:
Row 1[RS]: Change color to CC. k to end of row.
Row 2[WS]: p
Continue to p every WS row.
Row 3: k
Row 5: Change color to MC. k to end of row.
Row 7: k
Repeat rows 1-8 one more time [4 stripes over 16 rows knit]
Body Increases:
Row 1[RS]: Change color to CC. k1, kfb, k 14 st, kfb, k1.
Row 2[WS]: p
Continue to p every WS row.
Row 3: k
Row 5: Change color to MC. k1, kfb, k 16 st, kfb, k1.
Row 7: k
Row 9: Change color to CC. k1, kfb, k 18 st, kfb, k1.
Row 11: k
Row 13: Change color to MC. k1, kfb, k 20 st, kfb, k1.
Row 15: k
Body Finish:
Row 1[RS]: Change color to CC. k to end of row.
Row 2[WS]: p to end of row.
Continue to p every WS row.
Row 3: k
Row 5: Change color to MC. k
Row 6 [WS]: *[k1, p1] repeat to end.
Row 7 [RS]: *[p1, k1] repeat to end. [Seed stitch]
Repeat rows 6 and 7 four more times [Six rows of seed stitch total]
BO.
Finishing (Body):
Cut yarns leaving at least 6 inch tail. Thread MC yarn onto tapestry needle and sew in tail on WS.
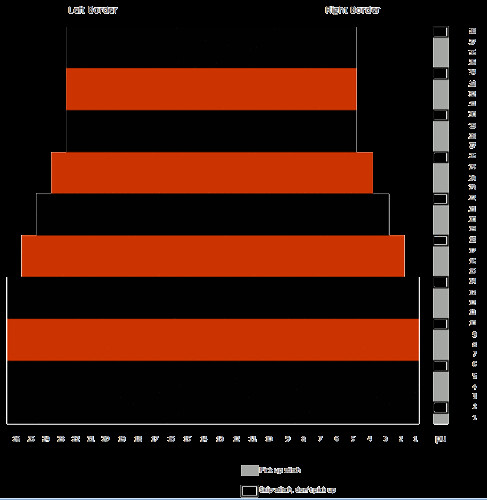
Applied I-Cord Trim [Left Border]:
(See chart for border placement)
With WS facing, begin to pick up stitches. You will begin at row 1 on chart.
Follow chart pattern from bottom to top.
pu 1, skip one st, *[pu 3 st, skip one st], repeat from * to thumb opening [34 stitches on needle]
pu 16 st, skip one st
*[pu 3 st, skip one st], repeat from * to last 2 st, pu 2. [58 stitches on needle]
Turn so RS is facing
CO 2 st on dpn.
Row 1: k1, sl 1, k1 from body, psso. Sldpn.
Row 2: k1, sl 1, k1 from body, psso. Sldpn.
Row 3: RS stil facing, k2. Sldpn.
Row 4: RS stil facing, k2. Sldpn.
Row 5: k1, sl 1, k1 from body, psso. Sldpn.
Row 6: k1, sl 1, k1 from body, psso. Sldpn.
Row 7: k1, sl 1, k1 from body, psso. Sldpn.
Row 8: RS stil facing, k2. Sldpn
Row 9: RS stil facing, k2. Sldpn.
Repeat rows 5-9, one more time [2 times total, 8 stitches on needle]
Begin Thumb portion:
Row 1: k1, sl 1, k1 from body, psso. Slide stitches to opposite end of dpn.
Repeat Row 1, 15 more times [16 rows total]
To the end:
Row 1: RS stil facing, k2. Sldpn.
Row 2: RS stil facing, k2. Sldpn.
Row 3: k1, sl 1, k1 from body, psso. Sldpn.
Row 4: k1, sl 1, k1 from body, psso. Sldpn.
Row 5: k1, sl 1, k1 from body, psso. Sldpn.
Row 6: RS stil facing, k2. Sldpn
Row 7: RS stil facing, k2. Sldpn.
Repeat rows 3-7 ten more times [11 times total]
Last stitch on body: k1, sl 1, k1 from body, psso.
BO stitches.
Cut yarn and sew in tail.
Applied I-Cord Trim [Right Border]:
(See chart for border placement)
With WS facing, begin to pick up stitches. You will begin at row 73 on chart.
Follow chart pattern from top to bottom.
pu 2, skip one st, *[pu 3 st, skip one st], repeat from * two times to thumb opening [8 stitches on needle]
pu 16 st, skip one st
*[pu 3 st, skip one st], repeat from * to last st, pu 1. [58 stitches on needle]
Turn so RS is facing
CO 2 st on dpn.
Row 1: k1, sl 1, k1 from body, psso. Sldpn.
Row 2: RS stil facing, k2. Sldpn.
Row 3: RS stil facing, k2. Sldpn.
Row 4: k1, sl 1, k1 from body, psso. Sldpn.
Row 5: k1, sl 1, k1 from body, psso. Sldpn.
Row 6: k1, sl 1, k1 from body, psso. Sldpn.
Row 7: RS stil facing, k2. Sldpn
Row 8: RS stil facing, k2. Sldpn.
Repeat rows 4-8 ten more times [total of 11 times]
Begin Thumb portion:
Row 1: k1, sl 1, k1 from body, psso. Slide stitches to opposite end of dpn.
Repeat Row 1, 15 more times [16 rows total]
To the end:
Row 1: RS stil facing, k2. Sldpn.
Row 2: RS stil facing, k2. Sldpn.
Row 3: k1, sl 1, k1 from body, psso. Sldpn.
Row 4: k1, sl 1, k1 from body, psso. Sldpn.
Row 5: k1, sl 1, k1 from body, psso. Sldpn.
Row 6: RS stil facing, k2. Sldpn
Row 7: RS stil facing, k2. Sldpn.
Repeat rows 3-7 one more time
Row 13: k1, sl 1, k1 from body, psso. Sldpn.
Row 14: k1, sl 1, k1 from body, psso. Sldpn.
BO stitches.
Cut yarn and sew in tail.
Finishing (Laces):
Measure 1 piece of MC yarn 36 inches long (3 feet). Thread onto seaming needle and thread into opening you have made in the applied i-cord border. Alternate like you’re lacing shoe laces (As shown in pictures).
Pattern (First Half)
Pattern (Second Half)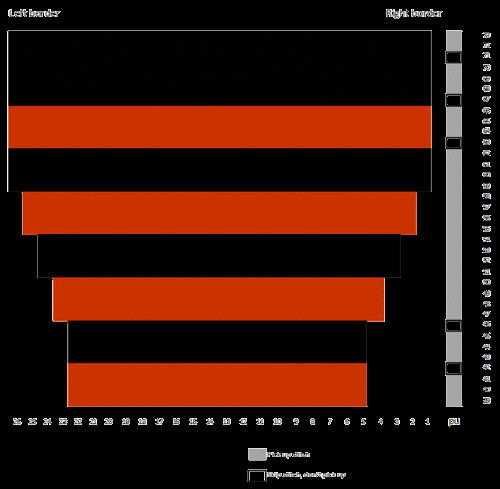
Video Instructions! (Added June 22, 2008)
Part 1 – Picking up stitches along the glove edge (follow the chart and watch where the spaces go)
Part 2 – Picking Up stitches for the thumb portion
Part 3 – Knitting on the applied i-cord with spaces for lacing holes.
Hope these videos help!


Those are so cool! And you are so talented to design them yourself!
THANK YOU! I’ve been looking for something exactly like this for a while now. :)
These are VERY cool. Most patterns calling themselves “punk” really… aren’t. But these? These would get even Sid Vicious hot.
Those look so cool. Great job!
I’ve been trying to do this for a while.. A long time. And I am happy to announce that I am half finished. It looks really good and I feel unworthy each time I glare at this page and your <>amazing<> pattern – and I mean that.
YAY those videos help SO MUCH! Exactly what I needed. Thank a million times over for taking the time to do that. :) Your house is so QUIET. Omg I’ve never heard my house be that quiet, not even at night! lolthank you!!!!!!!!!!!XOXO
Thanks for posting the videos! These gloves will be a tremendous gift for a hard rocking girl I know. Nice design work on your part too!
Hmm, I think I’ll make these in time for Christmas… that’ll shock the grandparents… ;)
Interesting to know.
Beautiful! I know exactly what to make my fellow costume shop assistant goth kid friend for Christmas.
I have a question. I have not used DP needles before. Can you just use straights or would it look funny?I really want to try my hand at these. I don’t want to screw them up though.
Ruthie – the dpns are only for the part where you do the applied i-cord. There you will need to use them. But for the gloves themselves, as in the pattern instructions, I recommend straight needles – anything that’s comfortable for you :) jenny
Ooh, nice! I shall have to make them =)
These videos were terribly helpful! thanks so much!!
In the body increases section, you use the abbreviation “kfb”, but you never explain what that means. So, um, what does kfb stand for?Other than that, this pattern is awesome!
Wow, amazing. I’m making these as soon as I buy some yarn tomorrow!! Thanks for the pattern.
Hey! I made a pair of these for myself using the exact pattern! They are so awesome! I love wearing them on cold days. I’m making these same gloves with a different pattern (vertical stripes instead of horizontal) for a friend of mine! Keep up the great work!
I just downloaded the pattern, congratulations on designing something soo fashionable and popular.Cant wait to start my pair.
this is so great! i’ve always wanted lace-up arm warmers…
i’m going to try making a regular i-cord and sewing it on instead of knitting it on. it’s simpler that way.
Wow… you kind of rock. :D
Thanks so much for posting the pattern, I’m planning on going out to buy myself the black yarn in a few minutes. Keep up the good work, you’re awesome!
~Kel
well, you see, I really love the gloves, they’re awesome, but I’m 11, and i have no idea how to read the patterns and I don’t know what a lot of things stand for. I was wondering, if it isn’t too much trouble, if you could make the pattern more kid-friendly, because I absolutely love the gloves and i really want to try making a pair. Thanks!
Just making my 12 yo daughter a small pair of these. I could never have done the attatched I-cord without the videos! Thanks so much for taking the time to record them!
hey again… so I'm on the second glove and now I'm wondering… for the seed stitch section, you say "repeat rows 1 and 2 four more times", but you're only supposed to have six rows (since the pattern picks up again on Row 7). Doesn't that mean you should only repeat 1 and 2 two more times, or is the row count off?
OMG!!!! I love these. I wanna make one for me with green!!!!!!! (I <3<3<3 green.) I wanna make one for my friend who is so punk. She would love them. I hav 2 ask her wat her fave color is. Thx 4 the vids, they will b a HUGE HUGE HUGE help.
[…] Rockstar. ’Nuff said. Rockin! It's a toss-up whether these would be warmer than the lacy option above. […]
[…] used a pattern I’ve been fond of for a while, Jenny Dolan’s Punk Rock Corset Gloves. It served as inspiration for the God Metal Armwarmers I knit back in November, but I have never […]
Is it better to break the yarn when changing colors or to just carry them up the side?
I prefer to carry them up the side. If u break the yarn each color change u add a good amount of extra work by having to weave in all the loose ends. You can switch every color change but u have to be careful to keep the tension even. If y pull too tight the piece could pucker. What I did was pull the prev color yarn up and twist the yarn at the middle or at the beg of 3rd row. That way it is carried up every 2 rows instead of 4.
Wish they were in crochet :( Love them sooo much – you are a talented, and very cool lady! :D
awesome! i wish it was in a crochet pattern though! im learning to knit! :)
So cool! I am 11 and I have been looking for a pattern like this. Looks like an easy pattern. Gonna make it soon. Best pattern ever!!!!! :-D :-P
My bff sent me this and I hope to have them ready for her birthday in October, I just hope I do it right *fingers crossed*
I just started the applied i-cord on the first glove – these are FANFREAKINGTASTIC! Thanks for posting this pattern.
thank you for not only the pattern, but the you tube videos. im not very good with knitting. right now i was thinking of making wristlets for my best friends birthday, and i was like she would love these but when i saw that it was intermediate to advanced i was like, “NOOOO” i really thankful for the youtube videos which makes it more possible for me to make.
Fantastic post however I was wondering if you coul write a litte more on this topic?I’d be very thankful if you coulpd elaborate a little bit more.Thank you!
[…] found the pattern for Punk Rock Corset Gloves in my favourites list over on Ravelry where apparently I’d seen them years ago but forgotten […]